Керування кондиціонером за допомогою системи автоматизації будинку може бути корисним, але більшість дешевих домашніх кондиціонерів не мають інтерфейсів для керування. Вони можуть керуватись тільки за допомогою інфрачервоного пульта керування. Гарна новина у тому, що зробити пристрій котрий буде відправляти на кондиціонер таки самі команди як пульт не складно. В інтернеті можна знайти кілька готових бібліотек, мені більш сподобалась arduino-heatpumpir. Вона підтримує arduino, ESP8266 та з моєю допомогою – ESP32.
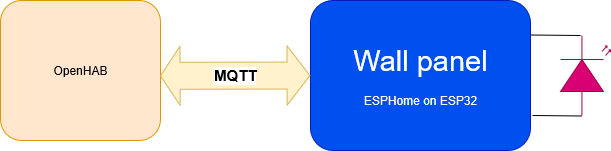
arduino-heatpumpir це бібліотека, яка дозволяє керувати кондиціонерами з якогось коду, це не готове рішення. Для керування я бажаю використовувати OpenHAB за допомогою MQTT. У якості апаратного забезпечення я буду використовувати ESP32 модуль з підтримкою Ethernet. Програмне забезпечення модуля – ESPHome. У результаті треба створити таке рішення:
Створюємо конфігурацію для ESPHome:
esphome:
  name: heatpumpcontroller
  platform: ESP32
  board: wesp32
  includes:
    - heatpumpcontroller.h
  libraries:
    - "HeatpumpIR"
    - "Adafruit BMP085 Library"

web_server:
  port: 80

mqtt:
  broker: 192.168.0.101

ethernet:
  type: LAN8720
  mdc_pin: GPIO16
  mdio_pin: GPIO17
  clk_mode: GPIO0_IN
  phy_addr: 0

i2c:
  sda: 33
  scl: 5
  scan: True

sensor:
  - platform: bmp085
    temperature:
      id: bmp085_temperature
      name: "Outside Temperature"
    pressure:
      name: "Outside Pressure"
    update_interval: 60s

binary_sensor:
  - platform: gpio
    pin: GPIO15
    name: "Switch"
    on_press:
      then:
        - climate.control:
            id: my_cliamte
            mode: COOL
            target_temperature: 21°C

climate:
  - platform: custom
    id: my_custom_climate
    lambda: |-
      auto my_custom_climate = new MyHeatPumpClimate(bmp085_temperature);
      App.register_component(my_custom_climate);
      return {my_custom_climate};
    climates:
      - name: "My Custom Climate"
        id: my_cliamte

# Enable logging
logger:

# Enable Home Assistant API
api:
  password: "otapass"

ota:
  password: "otapass"
Ця конфігурація використовує спеціально створене розширення для клімат-компонента. Додатково ця конфігурація має можливість за допомогою кнопки керувати кондиціонером, ця можливість зроблена тільки для тестів.
Вихідний код цього модуля:
#include "esphome.h"

#include
#include


using namespace esphome::climate;

class MyHeatPumpClimate : public Component, public Climate {
 public:
  // constructor

  MyHeatPumpClimate(sensor::Sensor *sensor) {
    this->sensor_ = sensor;
  }

  void setup() override {
    heatpumpIR = new R51MHeatpumpIR();
    powerModeCmd = POWER_OFF;
    operatingModeCmd = MODE_AUTO;
    fanSpeedCmd = FAN_AUTO;
    temperatureCmd = 22;
    swingVCmd = VDIR_AUTO;
    swingHCmd = HDIR_AUTO;
    //this->sensor_->add_on_state_callback([this](float state) {
      //this->current_temperature = state;
      // control may have changed, recompute
      //this->compute_state_();
      // current temperature changed, publish state
      //this->publish_state();
    //});
    //this->current_temperature = this->sensor_->state;
    ESP_LOGI("custom", "Setup climat OK");
  }

  ClimateTraits traits() override {
      ClimateTraits climateTraits;
      climateTraits.set_supports_current_temperature(true);
      climateTraits.set_supports_two_point_target_temperature(false);
      climateTraits.set_supports_auto_mode(true);
      climateTraits.set_supports_cool_mode(true);
      climateTraits.set_supports_heat_mode(true);
      climateTraits.set_supports_away(false);
      return climateTraits;
  }

  void control(const ClimateCall &call) {
    if (call.get_mode().has_value())
        this->mode = *call.get_mode();
    if (call.get_target_temperature().has_value()) {
      ESP_LOGI("custom_heat", "Set temp to : %f", *call.get_target_temperature());
      ESP_LOGI("custom_heat", "Old: %i", temperatureCmd);
      temperatureCmd =  *call.get_target_temperature();
      ESP_LOGI("custom_heat", "New: %i", temperatureCmd);
    }
    //if (call.get_target_temperature_low().has_value())
    //    this->target_temperature_low = *call.get_target_temperature_low();
    //if (call.get_target_temperature_high().has_value())
    //    this->target_temperature_high = *call.get_target_temperature_high();
    //if (call.get_away().has_value())
    //    this->change_away_(*call.get_away());
    this->compute_state_();
    this->publish_state();
  }

  void compute_state_() {
    switch (this->mode) {
      case climate::CLIMATE_MODE_OFF:
        powerModeCmd = POWER_OFF;
        break;
      case climate::CLIMATE_MODE_AUTO:
        powerModeCmd = POWER_ON;
        operatingModeCmd = MODE_AUTO;
        break;
      case climate::CLIMATE_MODE_COOL:
        powerModeCmd = POWER_ON;
        operatingModeCmd = MODE_COOL;
        break;
      case climate::CLIMATE_MODE_HEAT:
        powerModeCmd = POWER_ON;
        operatingModeCmd = MODE_HEAT;
        break;
      default:
      ;
    }
  }

  void publish_state() {
    ESP_LOGI("custom_heat", "Sed data via IR  power : %i, mode: %i, fan: %i, temp: %i, sV: %i, sH: %i",  powerModeCmd, operatingModeCmd, fanSpeedCmd, temperatureCmd, swingVCmd, swingHCmd);
    IRSenderESP32 irSender(2, 0);
    heatpumpIR->send(irSender, powerModeCmd, operatingModeCmd, fanSpeedCmd, temperatureCmd, swingVCmd, swingHCmd);
  }

 protected:
    HeatpumpIR *heatpumpIR;
    uint8_t powerModeCmd;
    uint8_t operatingModeCmd;
    uint8_t fanSpeedCmd;
    uint8_t temperatureCmd;
    uint8_t swingVCmd;
    uint8_t swingHCmd;
    sensor::Sensor *sensor_{nullptr};

};
У результаті цим модулем можна керувати за допомогою MQTT наступних MQTT команд:
Керування режимом – heatpumpcontroller/climate/my_custom_climate/mode/command, можна відправляти OFF, AUTO, COOL, HEAT
Керування температурою – heatpumpcontroller/climate/my_custom_climate/target_temperature/command, можна відправляти ціле число, наприклад 22, 23 та далі за бажанням.
Увесь код можна знайти на github
Код протестовано на кондиціонери SENSEI з пультом R51M/E.